Home / Tech
/ The Bat! FAQ / How-Do-I
The Bat! Filtering
The Bat! has phenomenal filtering capabilities, and with a little
effort you can create filter bases that perform all sorts of functions. Let's start with
some basic of filter creation, and then we'll get to the meat.
There are a couple of ways to invoke the creation of a filter, and
they are:
- CTRL-SHFT-F
- Accounts > Sorting Office/Filters
The first is used when you have selected a message and wish to
create a filter for that/those types of messages. This will open a filter dialog window
with the basic options available for you to enter. However, you can open the full-blown
filter dialog window by clicking the EDIT button. The basic filter dialog
is for quick creation of filters that basically just move a message from one folder to
another.
The second way to get into the filtering dialog window is for when
you wish to set up a complicated filter. By complicated, I mean that it does something
more than just move a message based on filtering strings in the SENDER, SUBJECT, or
RECIPIENT.
The Opening Filter Window
When you first open the filter dialog window, you are presented
with the below screen.
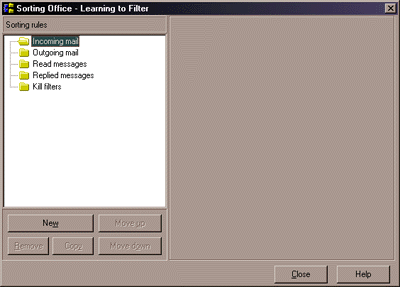
There are five types of filters, and they are:
- Incoming mail - These filters are invoked while messages are
being downloaded from the mail server.
- Outgoing mail - These filters are invoked after messages have
been sent to the SMTP server.
- Read messages - These filters are invoked after reading a
message, and after you change focus to another message or folder.
- Replied messages - These filters are invoked after replying to a
message.
- Kill filters - These filters are invoked before messages are
downloaded from the mail server. I'll explain this one in greater detail later
on.
Below the filter types list, you'll notice five buttons, here's what they do:
- New - Create a new filter under the filter type currently selected.
- Remove - Delete the currently selected filter.
- Copy - Creates a duplicate of the currently selected filter at the very bottom of
the filter list. You can then move it to a new hierarchy or into a different filter type.
- Move up and Move down - Filter hierarchy is very important to
TB. Filters are checked in a top-down fashion. This means if you have two filters checking
for the same filter string, but are performing different actions, then the topmost listed
filter will be invoked first.
Incoming Filters
Alright, we are now to the meat of the TB filtering subsystem. You can do some
really neat things with filters. For example, say you would like to invoke the FTP server
software on your machine from a remote location so that you can then log on and download
or upload files to it. Say no more, TB will do that with ease, and I'll show you how to
set something up like that later. For now, let's start with the basics.
If a filter exists under a filter type, it will have a "+" symbol in
front of the filter type folder. If you don't have any filters yet, there will be no
"+", and you just need to click on the filter type folder and then click the NEW
button to create one. Go ahead and click on the Incoming filter type folder, and then
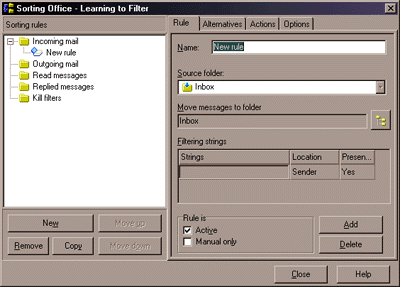
click the NEW button. You should see a screen like the one below.
Ok, let's set up a scenario to help us, as opposed to just randomly setting up
filters.
Let's say that you are a help desk person for your company, and it is one of
your jobs to receive Trouble Tickets (requests for tech support and/or the opening of a
job for a malfunctioning piece of equipment or software.) Once the Trouble Ticket has been
received from the mail server, you need to move the Trouble Ticket Request to the Trouble
Ticket Requests folder, because you don't want it cluttering up your Inbox, and you might
not be able to process the Trouble Ticket immediately. However, something else needs to
happen during this Incoming filter. You need to send an auto-generated
reply to the user to let them know that you have received their request.
Let's now say that all of the above has happened, and you have come back from
lunch to start processing the Trouble Tickets that are now sitting in the Trouble Ticket
Request folder. After you have determined what it is the user is requesting and initiating
whatever action is appropriate, you want the processed Trouble Ticket to be moved to the
Processed Trouble Tickets folder
What we need to do now is to create two filters.
I will further be referring to each filter dialog window by its tab name. For
example, in the above screenshot, we are currently viewing the RULE tab
(see the four tabs at the top of the screen towards the right and just below the window
Title Bar.)
For every filter you create, you'll want to have a unique and easy to understand
filter name. Believe me, once you get over thirty some odd filters, you're going to need
easy to remember names if you have to either change, move, or delete a filter.
If you haven't already created a new filter under Incoming mail,
then do that now.
Let's call the first filter "Trouble Ticket Requests", so enter that
in the Name field. Once you move your focus to another field, it will update the
filter name in the left-hand pane. Meaning, "New Rule" will change to
"Trouble Ticket Requests".
Now, the next field is a drop down box containing the names of all the folders
you currently have under this particular account. Because we are defining a filter for an
incoming message, we'll want to leave it set to Inbox. We'll be using
this field later when we set up our Processed Trouble Tickets filter.
The next field down is where we want to move a message to. For this filter we
want to select the Trouble Ticket Request folder. You do this by clicking on the little
folder icon to the right, and you'll see something like the below screen.
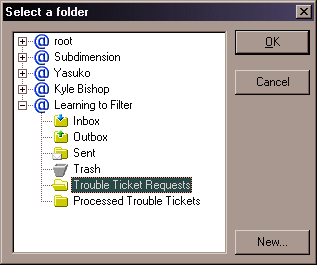
Go ahead and click the OK button, and you'll see that the Move
messages to folder field now reflects the correct folder.
Now we get to the filtering strings (also called rules.) These will
make or break (literally) your filtering subsystem. For you to effectively filter a
message, there must be something unique in a message for you to filter on. To put this in
perspective, let's say that you receive all of your mail at helpdesk@company.com. It
wouldn't make sense to set your filter rules to filter on that address in the recipient
field, because all of your mail would match that filter criteria. However, there are
exceptions where say, your mail server collects e-mail from other mail servers with
different e-mail addresses into one location, or you have multiple aliases for an account.
Generally though, you don't want to filter on your own e-mail address.
Let's take our scenario further and say that Trouble Ticket Request
messages always have the words Trouble Ticket Request in the SUBJECT field of the message.
Unless this is automated in the users e-mail program, chances are that you'll get all
sorts of variations on those words, but we'll get to that in a minute.
So, let's put the string "Trouble Ticket Request" in the Strings
field. Easy huh! Well, not exactly. Now we need to tell TB where to look for this string.
Since I said above that it will always be in the SUBJECT field of a message, you need to
click the word "Sender" in the field just to the right (this is a default
value.) A little arrow will appear, and you need to click that and then select SUBJECT.
The next field over is a simple true/false test. You need to ask yourself "Do I want
this filter to invoke if the string is found where I specified?" For our purposes, we
will want to leave it as YES.
There are cases where you don't want to invoke a filter when a
string appears. I like to think of these as exception filters. For example, let's say that
if a user replies to your auto-generated message (we'll be covering this in a little bit
too), you don't want your filter to treat their reply as a new Trouble Ticket Request.
To do this, you need to click the Add button to
add another string. When you do this, it is called ANDing. What this means is that the
first string AND the second sting must be true for the filter to invoke. Now, in the new
string field, enter [Re:]. The brackets surrounding the Re: means that TB is to treat it
as a string literal. This means that Re: will be true, but Re:do will be false. A better
explanation would be [cat], where cat would be true, but cats, catatonic, and catalyst
would be false.
In the Location field, you want to enter SUBJECT again,
but in the Presence field you want to select NO.
The Location field offers the below options:
- Sender - Who sent it to you
- Recipient - Usually your e-mail address or any aliases for your e-mail address.
This field can also be used as an exclusion filter string by putting your e-mail address
here and setting the Presence field to NO. This way if your e-mail address
doesn't appear in the TO field, then it might be SPAM and you can send it to the trash.
- Text - Searches in the message TEXT (what the person sending the message typed
in.)
- Kludges - Searches the headers. Useful for seeing if your e-mail address is in
the CC field when it doesn't appear in the TO field.
So, let's take another look at a screen shot to see where we are.
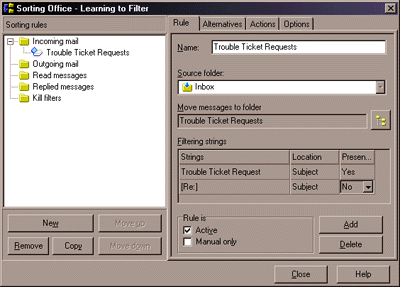
The only thing we have left on this tab is the Rule is
block. You have two options here. Active and Manual Only. Active
means that it is an automatic filter that is checked after messages have been downloaded. Manual
Only means that the filter will never be checked unless you invoke it manually via
the Folder / Re-filter option. Manual filters are useful for special case messages where
there are a lot of things that need to be done to the special message, but they only
happen once in a blue moon. It's also extremely useful for troubleshooting your filters in
that you can create a test message, and then run a folder > re-filter command and
select Manual Only filters.
If the world were a perfect place, we would be done with this
filter. Unfortunately it's not, and as I stated earlier, users will come up with all sorts
of variations on your filter string. I've been running multiple mailing lists and User
Discussion Lists (UDLs) for a while now, and no matter how clever I think I am in creating
a filter, someone always manages to come up with a variation I hadn't thought of.
That's what the second tab labeled ALTERNATIVES is
for. Above, we ANDed the first filter string and the second filter string. These both had
to be true for the filter to invoke. The ALTERNATIVES tab is for ORing.
For example, let's say you want a filter to invoke on any variation of the word cat, even
when misspelled.
You could put [cat] in the first string, [cats] in the second,
[kat] in the third, and [kats] in the fourth. You could even put in [catz] if you wanted
to. The only problem we'd have now is if someone forgot to put a space between [kc]at[sz]
and either the preceding or following word. For example "Mycat is hacking up a
hairball", or "My katslike playing tennis." The brackets will not accept
either of these instances. You could remove the brackets, but that would mean the words
"catatonic", and "catalyst" would now also be true. It's an ugly
situation, and other than creating a string for every possible variation (impossible!),
you'll just have to live with the occasional message that will break your filter. You
could set up exclusion strings to weed out the words "catatonic" and
"catalyst", but you're gonna need a dictionary to find all of the words that
have cat somewhere in them.
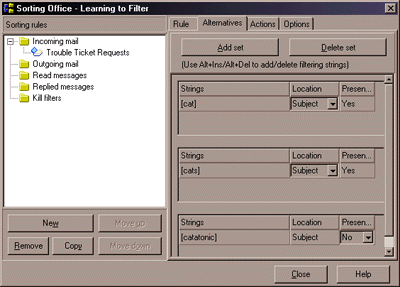
Just as an example, I set up the above ALTERNATIVES
for our Trouble Ticket Request filter. Here's the truth table for it.
- Invoke if SUBJECT contains the string "Trouble Ticket Request".
- Do NOT invoke if the SUBJECT contains the string literal "Re:".
- Invoke if the SUBJECT contains the string literal "cat".
- Invoke if the SUBJECT contains the string literal "cats".
- Do NOT invoke if the subject contains "catatonic".
So what problems do you see other than the obvious one of our Trouble Tickets
must somehow be related to cat problems (I don't know, maybe you're a veterinarian or
something <grin>)?
Well, firstly, any SUBJECT that contains the word "cat" or
"cats" will invoke this filter even if Trouble Ticket Request" does not
appear. Furthermore, any SUBJECT that has either "Re:" or "catatonic"
in it will break the filter. For example, the below SUBJECTS will break a filter.
- Trouble Ticket Request for a catatonic cat
- Re: My cat is sick
Theoretically, we wouldn't want our Trouble Ticket filter to invoke on the
second example anyway, so that's ok.
My whole point in this exercise is that filter strings will
make or break your filter subsystem, and is usually the cause of any hair loss.
Before I conclude the filter strings section, you need to know some control
characters. These characters (you've already learned what the brackets do) provide finer
control over how a string is matched.
The pipe character ( usually SHFT-\ ) allow you to OR strings within a single
rule set. In our above example, you could put [cat] | [cats] | [kat] | [katz] | [catz] on
a single line. This allows you to group ORs without creating a long list of filter sets
where you have to scroll up and down to see them all. This can be done on the ALTERNATIVES
tab as well as the RULE tab.
The double-quotes are used to make a case-sensitive match. So putting
"cat" would match "cat", "catatonic", and
"catalyst", but not "Cat", "caT", or "Cathy".
The above brings up an important point. What if you want to do a case-sensitive
sting literal match for just the word "cat". To do this, you'll need to enclose
the entire string in single-quotes. i.e. '[cat]'.
Well, that about covers the filter strings. Now we get to the much more fun and
much easier ACTIONS tab.
The only thing we have left on our Trouble Ticket Request filter is to set up
the auto-responder to let the user know that we have received their message.
Click on the Actions tab and just scroll through all of the
options available to get an idea of what all you can do.
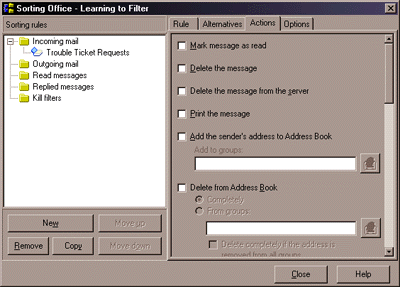
There are a plethora of options available here, and I will explain
what each of these do in detail later, but for right now we will just set up the
auto-responder.
Scroll down to the Send auto-reply option, and place a
checkmark in the box. The icon to the right now becomes available for you to click on. Go
ahead and click the icon which will bring up a template editor. There are two ways to do
this. The first is to just type the text into this editor that you want the user to see.
For example:
We have received your Trouble Ticket Request message which will be
processed shortly. Depending upon the severity of your problem, a technician will be with
you as soon as possible.
If you have any further questions, you can reply to this message.
Thank you
The Help Desk
But, the better way to do it is to put this text into a plaintext
message somewhere on your hard drive, and then use the macro %PUT="" (Put Text
File). This will let you use the same text file in other filters or macros elsewhere in
your system.
I'm not going to get into macros here, because that is an entire
section unto itself. I'll probably write a how-to on them as well, but you could check out
my how-to on setting up TB as a mailing list server to
get a good feel for macros.
Because the Send auto-reply action is specific to sending
a reply, you don't need to specify any e-mail addresses.
This pretty much finishes out the Trouble Ticket Request filter,
but just for fun let's set some other options. Say you need to print out a hard-copy of
the Trouble Ticket Request, then put a checkmark in the Print the message option.
Maybe you need to send a heads-up to some micro-manager somewhere, you could select either
Forward to, or Create a message for. Maybe you want to keep a running
soft-copy log file, you could select the Export message to file option and then
enable the Append to existing file option.
Granted, you could include macros in the Send auto-reply
to send CCs of the original message or even your reply, but I said I wasn't going to get
into macros in this section.
We're finally done with this filter. Now we need to create a new one to move
processed Trouble Ticket Requests to the Processed Trouble Ticket Requests folder.
Select the Read Messages filter type in the left-hand pane. Click the NEW
button, and name it "Processed Trouble Ticket Requests".
Set the Source folder field to the "Trouble Ticket
Requests" folder, and the Move message to field to "Processed Trouble
Tickets" folder, and in the Filter string put "Trouble Ticket
Request", Location SUBJECT, and Presence is YES.
You could actually just copy the Trouble Ticket Requests filter from the
Incoming filter type, but you might forget to unset some actions and all sorts of odd
things could happen.
Now, every time you read a Trouble Ticket Request in the Trouble Ticket Requests
folder, it will be moved to the Processed Trouble Ticket Requests folder. Granted this
isn't exactly the way you'd want to do it, because you might accidentally change focus from
the Trouble Ticket Request message and it gets moved before you've done whatever it is
you're supposed to do when processing Trouble Tickets. I just wanted you to get an idea of
what Read messages type filters are for, and that you can specify which Source
folder this filter will invoke for.
Now that we've got our filters made, let's examine the items on the ACTIONS
tab in a little more detail.
Mark as read - I use this for a daily e-mail version of a
newspaper. I know it's coming every day, but I don't want my folders showing that there
are unread messages in it.
Delete the message - This is useful for things like
auto-responder requests that require no interaction from you. An example would be requests
for your public PGP key. You want an autoresponder to send it to them, but you don't
necessarily need to see the request itself, and don't want to be bothered with deleting
the request message yourself.
Delete the message from server - If you have the Keep message
on server option enabled in your account properties, then this is useful for getting
rid of those PGP key requests from the server as well.
Print the message - Hmmm, guess.
Add the sender's address to the address book - This one has many
uses. Some people want to automatically add people to their address book when they reply
to a message from them. Another exceptional use is for mailing lists. Set up a subscribe
filter and have the sender's address added to the address book group for your list.
*Note: TB does not check to see if
the address exists already. If the address does exist, it won't create another entry.
However, let's say that you have a subscribe filter set to auto-add a person to the
subscriber list, and you have an auto-responder set to send a confirmation of their
subscription. In this scenario, you need to go to the Options tab and
put a check mark in the "Address(es) must not be listed in
the address book" option. Then select whichever string you want
to search (sender etc.), and what address book group you want it to
search.
Delete from address book - The opposite from the Add, but there
are two options. You can either remove every occurrence of their address, or just the ones
in specific groups.
*Note: Like the Add action, this also
has a bug. It does NOT check to see if the user exists first. This could really throw a
wrench into the works for an unsubscribe filter as TB will say the user was removed
whether they were in there or not. Luckily, TB has a setting on the
Advanced tab called "Address(es) must be listed in the address
book", and you set the sub-options to match accordingly.
Send auto-reply - Great uses for auto-responders.
Forward to - If your boss needs to see the messages as well, you
could use this option.
Redirect the message to - A good use for this would be if you
were maybe the point-of-contact for something, and then someone else took over. Until
everyone gets notice of this change, you could set this option in conjunction with a Delete
the message option to take yourself out of the loop.
Create a message for - If you needed to create a completely new
message to be sent when you receive a certain message, then this option will do what you
need. You can also use this to send, say, the current issue of your newsletter. Because
maybe you've set the Send auto-reply option to send the subscription confirmation
message, you need to be able to also send the most current edition as well.
Export message to file - Good way to keep a soft-copy digest of
list messages or whatever.
Run external program - If you recall the introduction to this
how-to, I mentioned that you could set up a filter to start an FTP server so you could log
in and upload or download files from it. Well, this is where you do it. You can also pass
messages to an external program for parsing or whatever by using the %1 after the path and
filename of the executable. You can also use the -c option to hide the process. i.e.
C:\utils\myfileparser.exe -c %1
Create a copy of message in another folder - Good for creating
total message archives of list traffic in a buried folder.
Extract attached files to the specified directory - If you want
the weekly performance reports to be stored in the "C:\Performance Reports"
directory instead of the account default attachment directory.
Well, that covers the ACTIONS tab. The only one we have left is
the OPTIONS tab.
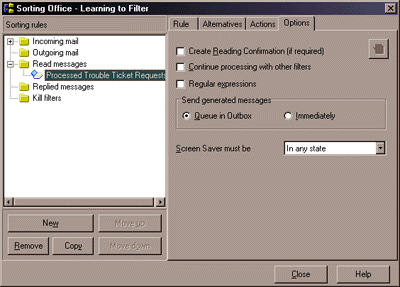
- Create reading confirmation - Allows you to override the account or folder
defaults of ignoring reading confirmations.
- Continue processing with other filters will let you run multiple filters on a
single message. However, you must remember that if you move a message in this filter, then
you must remember to set the correct Source folder for the other filter that you
need to use.
- Regular expressions - I don't know, never set it, but I think that it tells TB
that the filter strings contain REGEXPS. This is another how-to all in itself. I won't be
writing this one though, as I know the basics and that's it.
- Send generated messages allows you to override the account default settings.
- Screen Saver must be - Tells TB to whether it can invoke this filter during
screen savers or not. Maybe you're invoking an external program in this filter and it
doesn't react well with a screen saver.
Well, that covers all the filter types with exception to Kill
filters. This is probably the most often asked about filter type.
Basically, it allows you to delete messages from the server before they get
downloaded. Uses for this include SPAM filters or killing any message with an attachment
because you're paranoid about viruses.
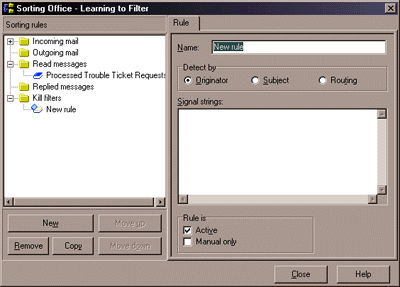
There is one thing to keep in mind about kill filters. They can be
slow. You will be running two different sessions with your mail server during the kill
filter process. The first session downloads the headers and matches against the kill
filter, then it uses those results to download or delete messages based on any matches it
found in the second session.
You can only kill based on the ORIGINATOR (who sent it), the
SUBJECT, or the ROUTING (what servers it passed through to get from the originator to
you.)
You place the signal strings (one per line) into the Signal
strings field.
You really need to be careful with these, as a logic flawed signal
string can delete mail that shouldn't have been. Therefore, it's advisable to set up an
Incoming filter to test the string first, and then include it in the kill filter when you
are confident that it is correct.
Well, that's it! It was long, but I hope detailed enough for you to
fully understand what TB has to offer in filtering capability.
If you have any questions or comments concerning this how-to,
please e-mail me.